Basic Knowledge of Android Modding#
The notes are sourced from the Bilibili Geek Bay video: A Must-Watch for Modding! Take You into the World of Android Modding
This tutorial only provides the basic framework and knowledge reserve that should be understood before modding.
For specific operations, you should still look for specific tutorials. Otherwise, you will encounter many troublesome small problems that cannot be solved during the modding process.
Related Websites:
Android Partition#
Android phones contain several partitions.
Boot Partition#
-
Stores boot and boot-related files, related to booting and startup
-
Contains the Kernel and Ramdisk of the operating system
-
Root operation is to modify the Boot partition
-
If the boot partition is erased or damaged, the phone will be stuck on the first screen during startup
System Partition#
-
Stores the Android system and system applications
-
The system partition contains the entire operating system and system software
-
System upgrades or flashing are often done on this partition
-
If the system partition is damaged, the phone will be stuck on the second screen during startup
Vendor Partition#
There is also a Vendor partition similar to the system partition.
-
It contains some applications and library files customized by the manufacturer
-
Many manufacturers directly put these files into the system partition for convenient future updates and maintenance
Data Partition#
-
The data partition stores user data, including applications, audio and video, images, system settings, etc.
-
Erasing the data partition will clear user data, but will not affect the normal startup of the phone
Cache Partition#
-
The cache partition of Android
-
Caching can help you quickly open the most frequently accessed data and applications in the system without reloading
-
Erasing the cache will not affect personal data, and it will be automatically generated for subsequent use
Recovery Partition#
-
The recovery partition contains a simple Linux system for recovering and maintaining the phone
-
It can be used to restore and update the content of other partitions (such as erasing data), similar to Windows PE (Pre-installing environment)
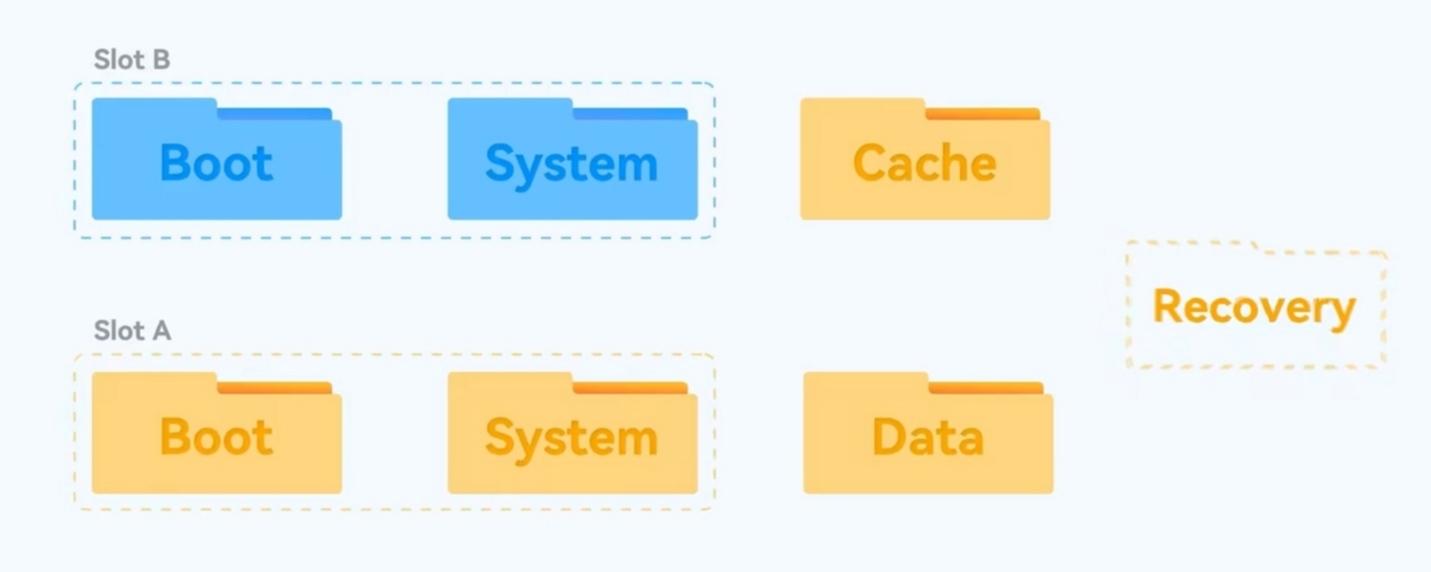
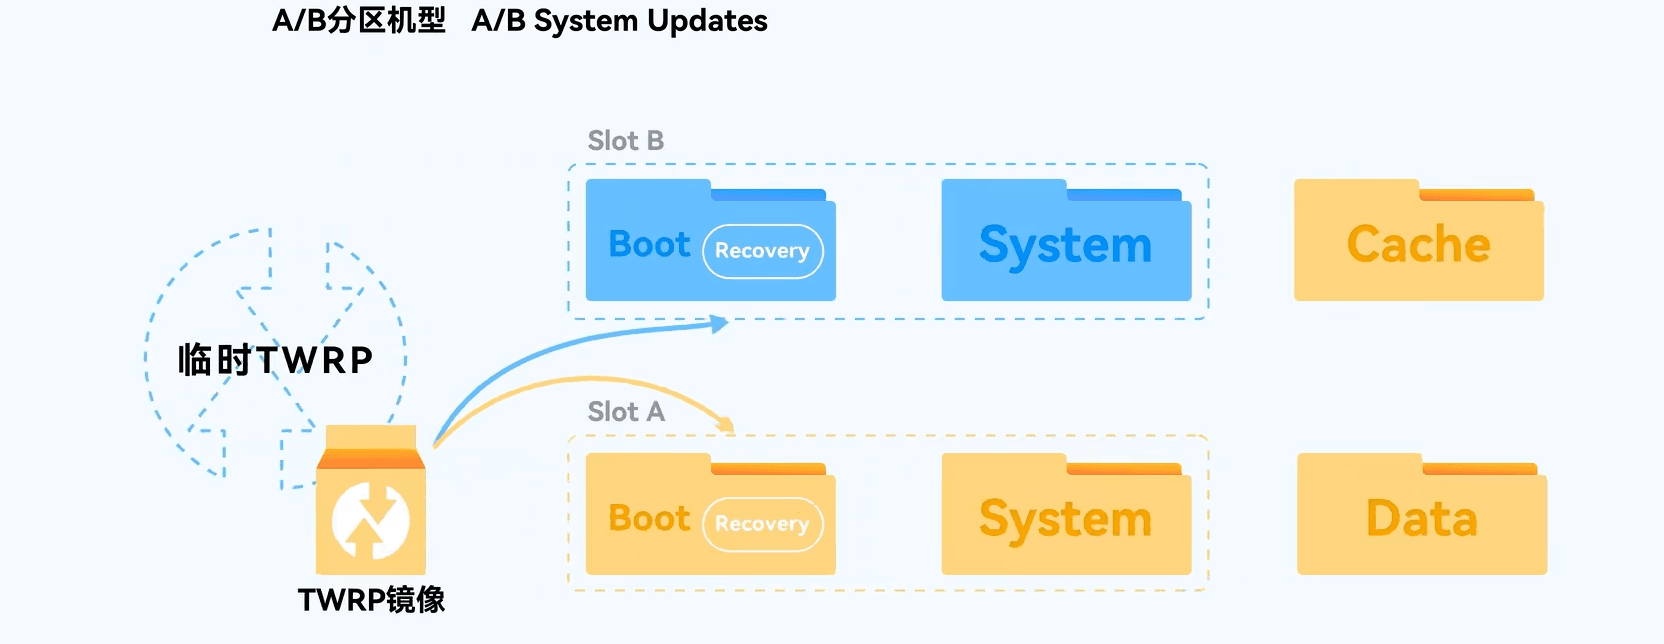
AB Partition#
In recent years, there have been more and more phones without a recovery partition. This is because Android introduced a new OTA upgrade method called A/B System Updates (AB partition) starting from version 7.0.
This upgrade method sets up two sets of boot and system partitions, SlotA and SlotB. The slot used during normal operation is the main partition, and the other slot is the backup partition.
This allows seamless system upgrades, and users can upgrade the system in the background while using the phone (updating the content of the backup partition). After the upgrade is complete, restart the phone, and the backup partition will automatically switch to the main partition. If the upgrade fails and the system cannot start, it will switch back to the previous partition. The disadvantage is that it will occupy double the system space.
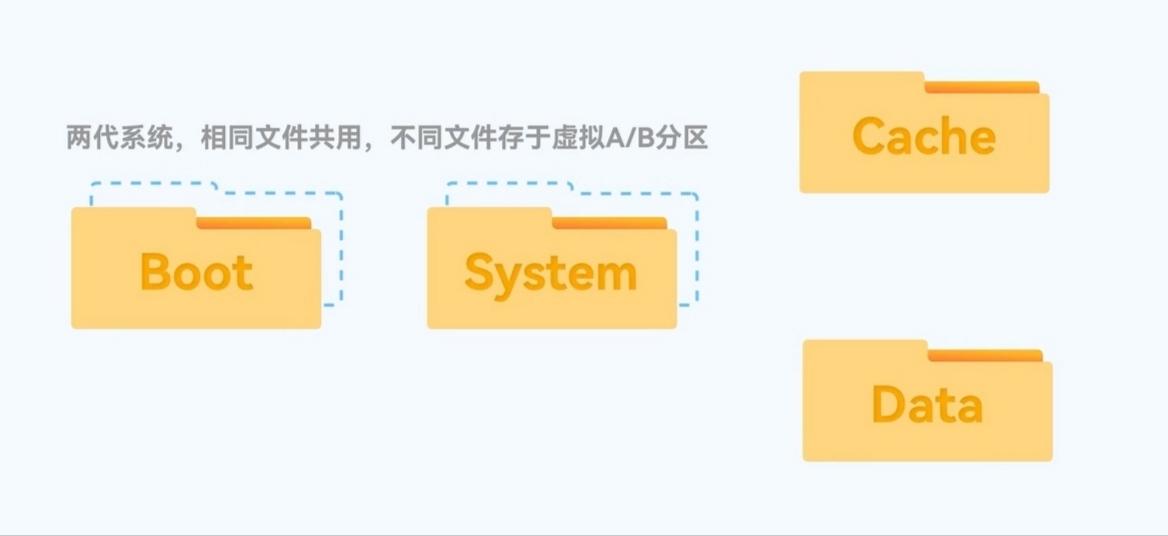
VA/B Partition#
To solve the space occupation problem, an improved version of the AB partition OTA upgrade method, called Virtual A/B System Updates (VA/B partition), was introduced.
Two generations of systems, sharing the same files, with different files stored in the virtual A/B partition. Currently, models equipped with Android 11 or above generally use the VA/B partition.
From the perspective of modding, it is more troublesome to flash a third-party recovery in A/B or VA/B partitions because both of these partitions incorporate the recovery partition into the boot partition.
Bootloader#
- If recovery is compared to PE, the bootloader belonging to the fastboot stage is equivalent to the BIOS/UEFI on the computer.
- The bootloader, as the name suggests, is the boot loader, and it has been working since the moment you press and hold the power button to start the phone.
- During this time, the bootloader will initialize the hardware devices in the phone and boot the operating system kernel (Kernel in the boot partition).
- In the later stage of booting, we can choose to enter a stage called fastboot (usually by pressing and holding the power button + volume down), which is what we commonly call the flashing mode.
- Fastboot is lower-level than recovery. Under fastboot, you can connect the phone to the computer and directly flash it by entering commands.
- Unlocking the phone, injecting boot images, and flashing the system all require the use of fastboot.
- The bootloader does not belong to a specific system partition. If a system partition is damaged and the phone becomes bricked, you can generally enter fastboot to rescue it.
- Using fastboot to flash a phone is generally called "line flashing" (connecting the phone to the computer with a data cable), and using recovery to flash a phone is generally called "card flashing" (downloading the card flash package to the phone)
Computer and Phone Environment Configuration#
Fastboot#
-
You can download the Android SDK for the computer from the official Android link, SDK Platform Tools
-
Android SDK Platform-Tools is a component of the Android SDK. It contains tools for interacting with the Android platform, mainly adb and fastboot.
-
After downloading and extracting, you can see the adb and fastboot files. Open the terminal in this directory to enter commands to operate the phone
-
If the device cannot be detected, go to the device manager on the computer to install the fastboot driver. Driver link: Modding Resource Collection (jamcz.com)

Common Fastboot Commands#
# Show fastboot devices
fastboot devices
# Get device-related information
fastboot getvar all
# Reboot the phone
fastboot reboot
# Reboot to bootloader
fastboot reboot-bootloader
# Erase partition
fastboot erase (partition name)
Example: Erase the system partition: fastboot erase system
# Flash partition
fastboot flash (partition name) (partition image)
Example: Flash the boot image "boot.img" to the boot partition: fastboot flash boot boot.img
# Boot image
fastboot boot (partition image)
Example: Boot to the recovery partition: fastboot boot recovery.img
# Flash ROM
fastboot update (flash package)
Example: Flash update.zip: fastboot update update.zip
# Unlock Bootloader
fastboot oem unlock (parameter depends on the model)
ADB (Android Debug Bridge)#
-
To connect to the computer, you generally need to enable USB debugging in the Developer Options on the phone, which is ADB (Android Debug Bridge).
-
ADB is a command-line tool provided by Android for debugging devices. With ADB, you can control the phone with various commands on the computer (without root).
-
For example, you can install software on the phone, adjust the screen resolution, simulate key clicks, and perform other interesting operations.
-
Many computer-side phone toolboxes, such as modding toolboxes, are based on ADB.
Root#
-
ADB can only achieve some debugging functions. To achieve more functions, you need root permission.
-
Open OEM unlocking in the Developer Options (if not available, forget it)
-
To root, you generally need to unlock the bootloader (bl lock), then modify the boot file, and flash Magisk (patched boot). The process of rooting is equivalent to modifying the boot partition.
-
Manufacturers generally lock the bootloader to ensure the security of the phone. Without unlocking the bootloader, you cannot modify the partitions.
-
Different brands have different unlocking methods, which will not be discussed here
Root Methods#
There are generally two methods to root:
1. Root through a third-party recovery#
- Official recovery generally only has simple recovery functions and will not allow you to flash random things
- To achieve a PE-like effect, you need to flash a useful third-party recovery
- Third-party recovery can not only root but also flash kernels, flash systems, backup data, etc.
- TWRP is currently a well-known third-party recovery
2. Flash boot image directly in fastboot#
The principle of Magisk to obtain root is to patch the boot partition. It can be directly operated in recovery, but we can also extract the current system's boot image and hand it over to the Magisk app for patching. After patching, it can be manually flashed back to the system.
The boot image can generally be extracted from the firmware package,
For line flashing packages, you can usually find the boot.img file by extracting it directly after decompression. For card flashing packages, there will be a very large payload.bin file after decompression, which can be unpacked using the payload_dumper.exe program. After unpacking, you can find the boot.img. Copy the obtained boot file to the phone, install the Magisk app on the phone, open it, click install, select patch a file, select boot.img, after patching, it will export the patched image to the download folder. Copy the patched boot to the computer, restart the phone to fastboot mode, and use the fastboot command (fastboot flash boot) to flash the patched boot to obtain root permission.
Download link for Xiaomi ROMs for all models and versions: XiaomiROM.com - Download the Latest and Historical Versions of Xiaomi ROM Flashing Packages and Card Flashing Packages
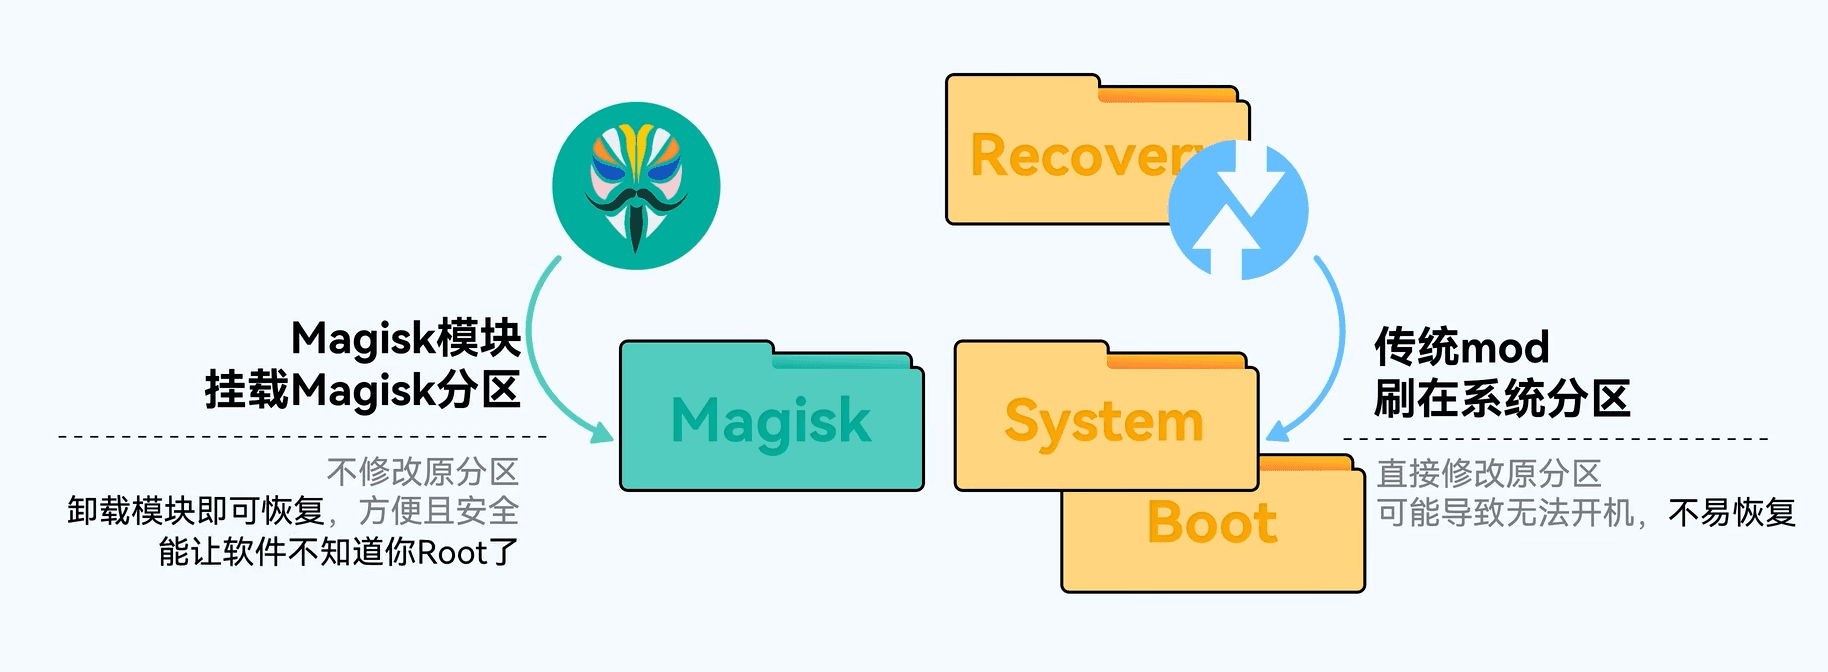
Boot Management Tool Magisk#
Magisk is commonly known as a mask. It can not only be used to obtain root permissions but also mount various modules.
Magisk Root Principle#
Magisk mounts a Magisk partition that is isolated from the system files to load its own content, which is completed in the bootloader stage. It can achieve functionality while keeping the system partition (system) intact, so it can hide root.
9008 Flashing (EDL Serial Port Flashing Mode)#
The flashing (line flashing) tools provided by OnePlus and OPPO are based on 9008. 9008 is a lower-level flashing tool on the Qualcomm platform and should only be used as a last resort.
Although the fastboot flashing method can solve most software problems, it cannot flash some lower-level things, such as baseband serial numbers.
Sometimes the phone becomes a black brick, and even fastboot cannot be entered. At this time, you can only use the 9008 mode to flash the phone.
The 9008 mode can solve almost all software problems on the phone.
Qualcomm universal: QFIL tool

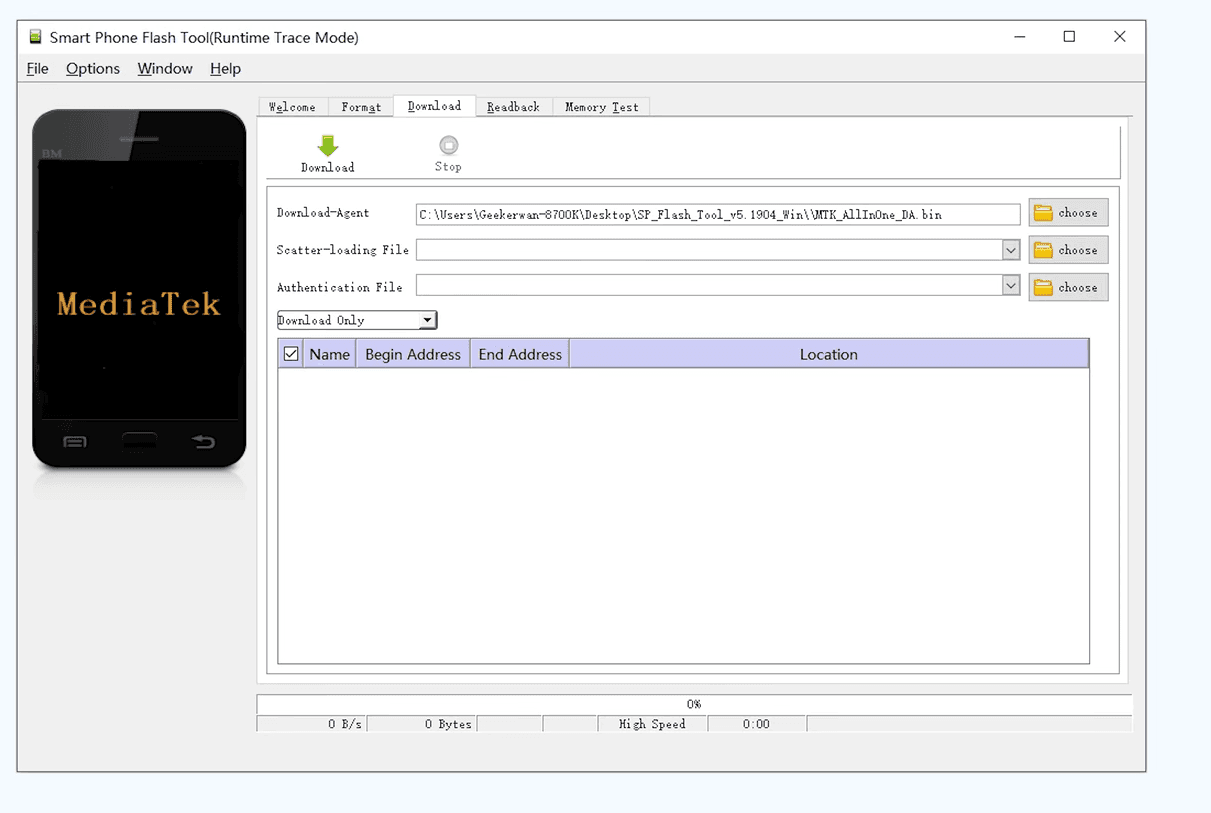
MediaTek universal: SP Flash tool
MiFlash (Pro) contains a manufacturer-customized 9008 flashing mode and has added some verification mechanisms. Authorization is required to use 9008.